- IaC for vRealize: Deploying vRealize Build Tools To Allow Infrastructure As Code for vRA and vRO
- IaC for vRealize: Manage Existing vRO Code With vRealize Build Tools & Set up Git Repositories
- IaC for vRealize: Define Dependencies, Manage Versions, Prepare & Release Packages & Deploy Artifacts
- IaC for vRealize: Documenting Code with JSDoc and Syntax Checking and Code Style Management with ESLint
- IaC for vRealize: Updating Archetypes and Adding Boilerplate For Your vRO Actions
Page Contents
This post has been deprecated and updated content can be found here
As any vRealize Orchestrator developer will tell you, managing code outside of the appliance is difficult. I recently wrote a post about Using Visual Studio Code for your vRealize Orchestrator Development, where I highlighted some of the challenges with this. The issue is that we’re not given the freedom to use any IDE we want, easily run unit tests on our code or do continuous integration with tools like Jenkins.
I did mention that a couple of solutions were going to make their way, one of these was internal tooling that VMware’s CoE team currently uses for their vRO development (you can read the article here: https://blogs.vmware.com/management/2018/11/automating-at-scale-with-vro-and-vra.html). It wasn’t possible to get access to these tools without engaging with CoE and forking up a bit of cash.
That is until now, as VMware has released these tools as a new fling. The fling is currently in preview, but you can check it out here: https://labs.vmware.com/flings/vrealize-build-tools. I think this is quite an exciting time for VMware developers as these tools could finally change the way we develop and manage our code and integrate into the wider developer ecosystem.
This is my first blog on this topic but if I find these tools useful, then there will be plenty more to follow. Getting the environment set up to use these tools is not straight forward and has several dependencies. These include deploying supporting infrastructure such as JFrog Artifactory, preparing all the required artefacts that are sourced from the vRO server and getting the workstation set up to create and manage packages.
Deploy and Configure Platform
Before the developer can begin using the vRealize Build Tools, the supporting platform has to be deployed and configured. This consists of setting up an Artifactory server to store Maven artefacts and build dependencies and preparing the artefact repositories.
Deploy Artifactory Server (skip if you already have this deployed)
This section will detail how to set up the Artifactory server and required dependencies. Note that the details below only deploy a single Artifactory node with the database instance running on the same machine. It is recommended that for a production environment to ensure Artificatory is deployed with high availability and connects to external/dedicated database instances.
Install Java Development Kit (JDK)
JFrog Artifactory requires the Java JDK 8 and above to be installed and the JAVA_HOME variable configured. I am using the Open Source version of these tools. Install using the following command:
sudo yum install -y java-1.8.0-openjdk-devel
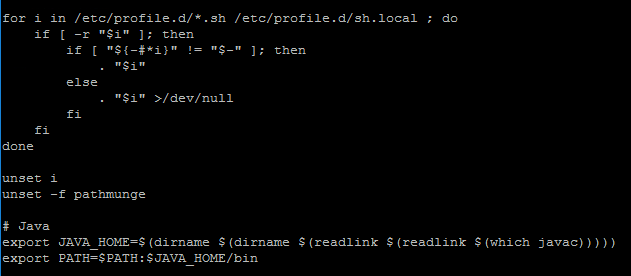
Add the following lines to ‘/etc/profile‘ to set the ‘JAVA_HOME‘ environment variable and add the Java bin directory to the path.
export JAVA_HOME=$(dirname $(dirname $(readlink $(readlink $(which javac)))))
export PATH=$PATH:$JAVA_HOME/bin
This is what my ‘/etc/profile‘ looks like:
Then source the file and check that the variables have been correctly configured:
source /etc/profile
env | grep JAVA_HOME
env | grep PATH
Install Maria DB (optional – you can use the internal Apache Derby database)
For non-production environments, I recommend to skip this section and use the internal Apache Derby database (default).
Artifactory requires MySQL or a compatible version to be installed so we’re going to go with MariaDB, which appears to be widely popular with Artifactory installations. You can install this directly from the CentOS repositories, but you may need to add additional repositories for other flavours.
sudo yum install -y mariadb-server
Start and enable the Maria DB instance:
sudo systemctl start mariadb.service
sudo systemctl enable mariadb.service
Next, you need to configure the Maria DB instance by running the following script which will perform a secure setup:
udo mysql_secure_installation
This will ask you to enter the current root password (just press enter) and set a new password. You can access the default responses for all other questions. Once this is complete, the Maria DB instance is ready.
Install Jfrog Artifactory
We will need to install the Open Source (OSS) version of Artifactory, which provides support for Maven. First, add the required repository using curl:
curl -sL https://bintray.com/jfrog/artifactory-rpms/rpm | sudo tee /etc/yum.repos.d/bintray-jfrog-artifactory-rpms.repo
And next, install Artifactory OSS
sudo yum -y install jfrog-artifactory-oss
Set the ‘ARTIFACTORY_HOME‘ variable in ‘/etc/profile‘ to the location of the Artifactory installation and source the file:
echo "export ARTIFACTORY_HOME=/opt/jfrog/artifactory" >> /etc/profile
source /etc/profile
env | grep ARTIFACTORY_HOME
Next, configure Artifactory to use the Maria DB database:
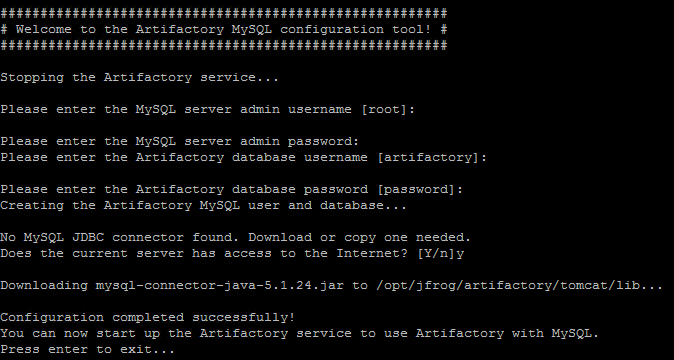
/opt/jfrog/artifactory/bin/configure.mysql.sh
Provide the root username and password for Maria DB and set the username and password used by Artifactory to connect to the database. If the server has access to the Internet, it will download the required MySQL connector.
Finally, start the Artifactory service:
systemctl start artifactory.service
And the bit that caught me out… enable exceptions to access this service in the firewall:
sudo firewall-cmd --permanent --add-port=8081/tcp
sudo firewall-cmd --reload
You should now be able to access the Artifactory page at http://artifactory_host:8081
Configure Jfrog Artifactory
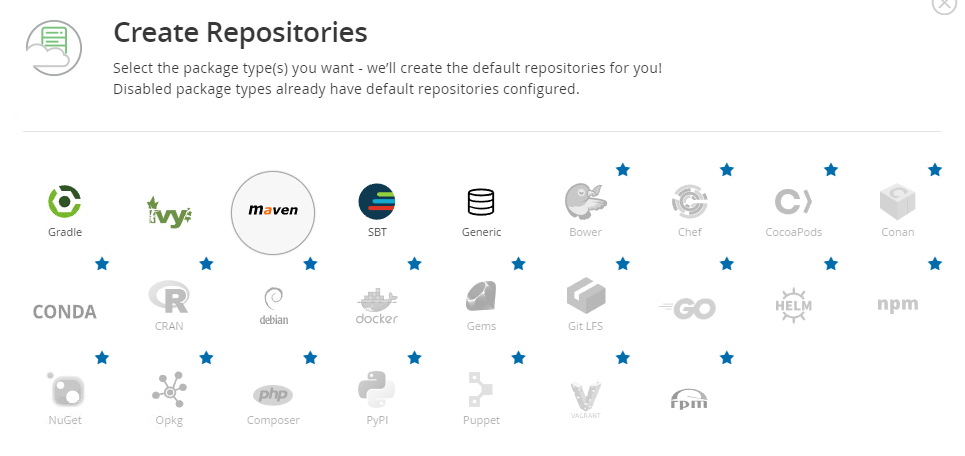
There isn’t much to configure but run through the configuration wizard and set a new admin password and proxy (if required). At the Create Repositories page, select Maven.
The base configuration is now complete and the following Maven repositories will have been created:
- libs-snapshot-local
- libs-release-local
- jcenter
- libs-snapshot
- libs-release
Generate API Access Key
So that we’re not passing plain text usernames and passwords when working with Artifactory, it’s best to create an API Key.
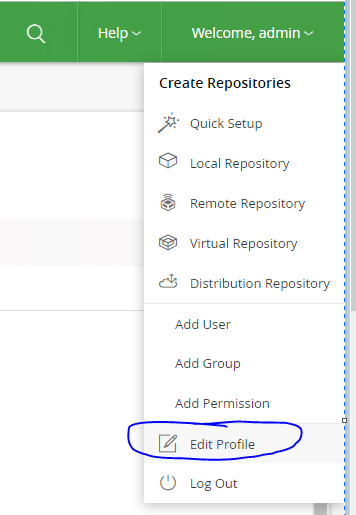
Log into the Artifactory GUI and select your username in the top right and when the drop-down appears, select ‘Edit Profile‘.
You will be asked to enter your password to unlock these settings. Once you have done so, click on the cog icon ![]() to generate an API key for your user. Copy this so that it’s easily accessible for use later.
to generate an API key for your user. Copy this so that it’s easily accessible for use later.
Install Jfrog CLI
You will need to use the jFrog CLI to upload the required artefacts to the repositories. You can download this single binary using curl and then copy it to a location in the environment path.
curl -fL https://getcli.jfrog.io | sh
mv jfrog /usr/local/bin/
Check that the CLI is working properly by outputting the version:
jfrog --version
![]()
The platform is now ready to be used with vRealize Build Tools.
Create vRealize Artifact Repositories
This section will cover getting the Artifactory repositories set up and preparing and uploading the vRealize artefacts.
Create vRealize Repository in Artifactory
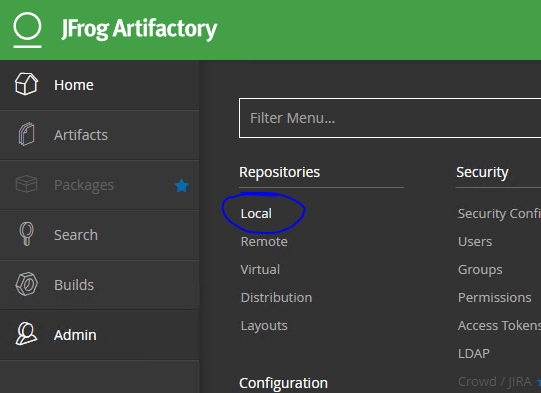
Before we begin to prepare the vRealize artefacts, we need to create a new local repository in Artifactory. Log into the Artifactory GUI and navigate to the ‘Admin‘ section. Under ‘Repositories‘ select ‘Local‘.
On the ‘Local Repositories‘ page click the ‘New’ button in the top right.
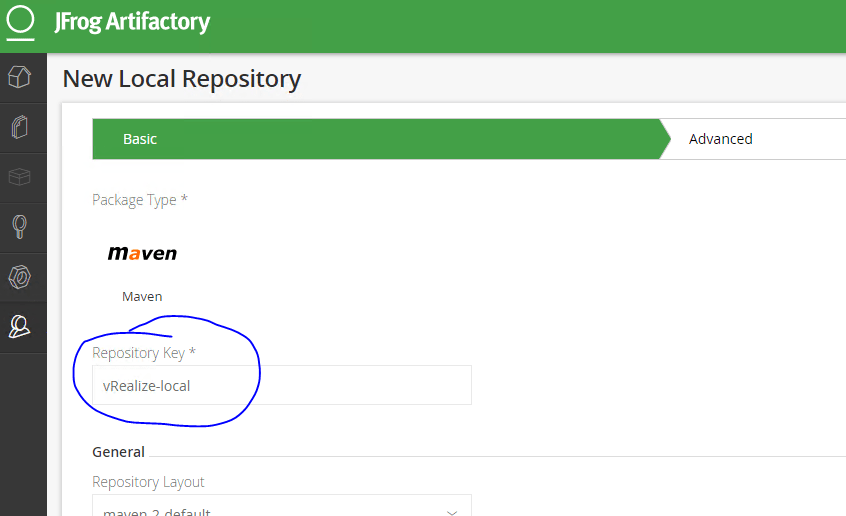
When asked to ‘Select Package Type‘, select Maven.
Name the repository (Repository Key) vRealize-local.
Leave all other settings as-as and click Save & Finish.
You will now need to add this new local repository to the virtual release repository libs-release.
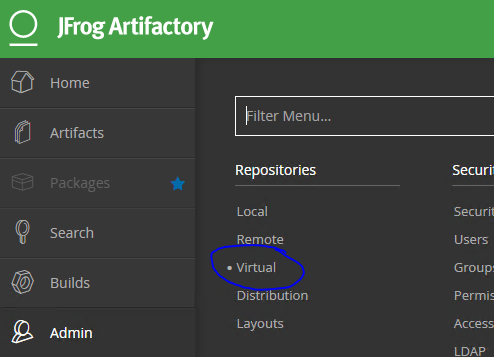
Navigate to the ‘Admin‘ section. Under ‘Repositories‘ select ‘Virtual‘.
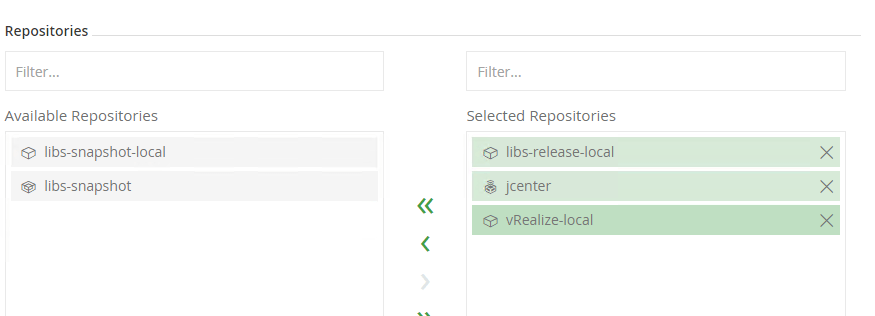
From the list of repositories, select libs-release. On the right, you will see Available Repositories and those which have been Selected. Select the vRealize-local repository and click the single right arrow button to move it into the Selected section.
To complete, click Save & Finish.
Artifactory is now ready to store vRealize artefacts.
Prepare vRealize Artifacts
I am going to prepare all the vRealize artefacts locally on the Artifactory server, but you can also do this on any server that you wish to use for CI.
If you haven’t already done so, download the vRealize Build Tools package and copy it to your home directory on the CI/Artifactory server directory (You may have to SCP the file).
You will also need to install the unzip command:
sudo yum install -y unzip
Create a new directory to store the contents and unpack the file:
mkdir ~/vrealize-build-tools
tar zxvf vrealize-build-tools-1.5.11-343.tar.gz -C ~/vrealize-build-tools
Next, navigate to the artefacts directory that has been created and verify that you can see the ‘iac-maven-repository.zip‘ file:
cd ~/vrealize-build-tools/artifacts/maven/
Create the following directory (in your home directory) which will store all the vRealize artefacts.
mkdir ~/vrealize_artifacts
Move the ‘iac-maven-repository.zip‘ file to this new directory:
mv ~/vrealize-build-tools/artifacts/maven/iac-maven-repository.zip ~/vrealize_artifacts/
Next, switch into this directory and use the unzip command to unpack the file:
And finally, delete the ‘iac-maven-repository.zip‘ file.
rm -f iac-maven-repository.zip
Confirm that the directory now contains a com directory and the archetype-catalog.xml file.
![]()
Upload vRealize Artifacts
Now with the vRealize artefacts prepared, they need to be uploaded to the vRealize-local repository that was created in Artifactory. To do this, you can use the Jfrog CLI by specifying the Artifactory URL, the API key created earlier for your account, the local directory to upload and the target Artifactory repository.
jfrog rt u --url=http://10.1.10.32:8081/artifactory --apikey=AKCp5dK4j8fPBuJ4UUYBLCYyqvheL69yhiUF3zpeW6Wbjiza7XVaCxLPgh4CnQASen8Sbnfdd --recursive=true --flat=false ./ vRealize-local
If you get asked to configure the CLI then select ‘N‘ as we’ll be specifying the URL and API at run time (there is a bug in the config when using an API key).
You will see the uploads begin and once this has finished you’ll be presented with a summary and hopefully that the upload was successful.
You have completed the preparation of the vRealize artefacts.
Create vRealize Orchestrator Repository in Artifactory
Create a new local repository in Artifactory called vro-local and add it to the virtual release repository lib-release (follow the same steps from the previous section).
Prepare vRealize Orchestrator Artifacts
Create the following directory (in your home directory) which will store all the vRealize Orchestrator artefacts and then switch to this directory.
mkdir ~/vro_artifacts
cd ~/vro_artifacts
The documentation provided with the vRealize Build Tools asks for artefacts to be pulled from a vRO 7.3 appliance. You will need to standup a vRO 7.3 appliance in which to extract these artefacts. The vRealize Build Tools do not support any other version, regardless of which vRO appliance version you are working with. Huge thanks to Jeff White for pointing this out. The vRO 7.3 artefacts have been confirmed to work with all versions of vRO, including 8.0.
You can use SSH/SCP to copy the required files, which are located in the ‘/usr/lib/vco/downloads/vco-repo‘ directory on the vRO appliance.
scp -r root@vro.sgroot.local:/usr/lib/vco/downloads/vco-repo/com com
Upload vRealize Orchestrator Artifacts
Now with the vRealize Orchestrator artefacts prepared, they need to be uploaded to the vro-local repository that was created in Artifactory. To do this, you can use the Jfrog CLI by specifying the Artifactory URL, the API key created earlier for your account, the local directory to upload and the target Artifactory repository.
jfrog rt u --url=http://10.1.10.32:8081/artifactory --apikey=AKCp5dK4j8fPBuJ4UUYBLCYyqvheL69yhiUF3zpeW6Wbjiza7XVaCxLPgh4CnQASen8Sbnfdd --recursive=true --flat=false ./ vro-local
You will see the uploads begin and once this has finished you’ll be presented with a summary and hopefully that the upload was successful.
Configure Anonymous User Permissions
The Artifactory anonymous user will need to be granted permission to read and deploy from the local repositories. This allows the build clients to access these repositories anonymously when creating and building packages.
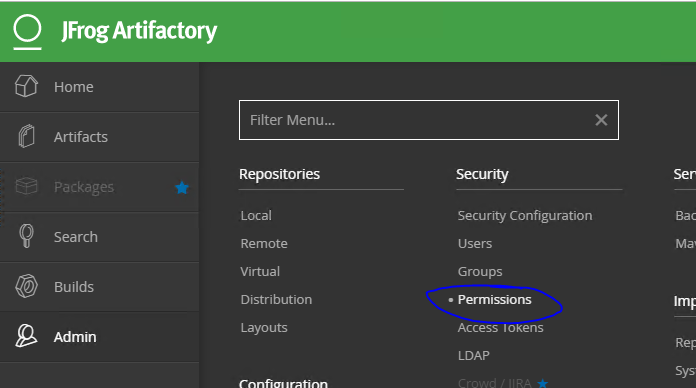
Log into the Artifactory GUI and navigate to the ‘Admin‘ section. Under ‘Security‘ select ‘Permissions‘.
On the Permissions Management screen, click New in the top right.
Name the permission ‘Anonymous Cache‘.
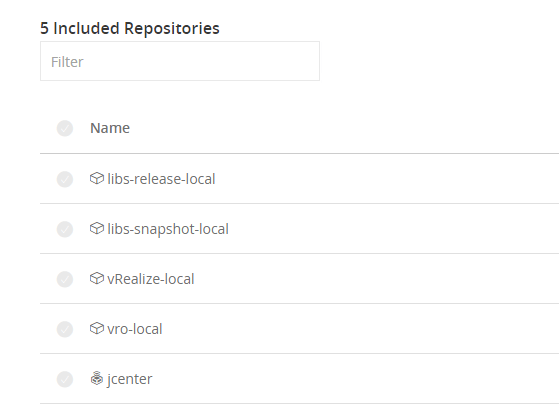
Under the Resources tab, we need to add all of the Available Repositories to the Included Repositories section using the arrow button![]() .
.
Under the Users tab, the anonymous user needs to be selected and granted the following permissions:
- Read, Annotate, Deploy / Cache
To complete, click Save & Finish.
Install vRealize Orchestrator Hints Plugin
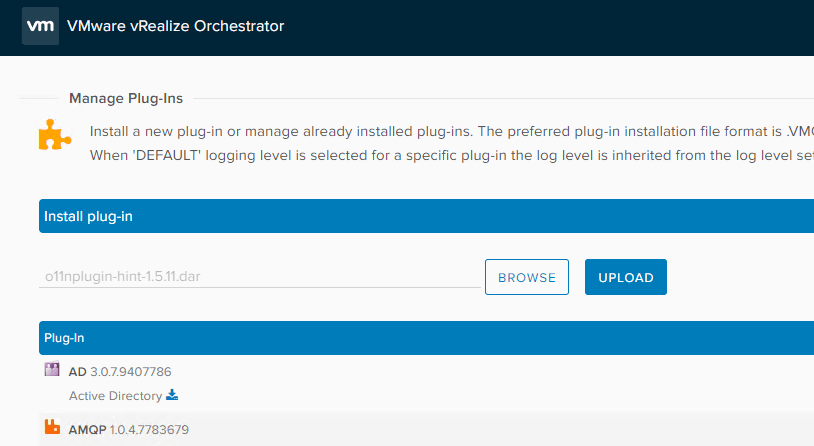
As part of the vRealize Build Tools, there is a vRO plugin provided in the ‘artefacts \vscode‘ directory in the downloaded package (tar.gz file). This plugin needs to be installed on the target vRO server and allows Visual Studio Code to discover the plugins and provide IntelliSense and code completion.
Log into the vRO Control Centre and install the ‘o11nplugin-hint-1.5.11.dar‘ plugin.
The vRO service will need to be restarted to complete the installation.
Make sure that you can connect to the vRO server using the client before continuing further.
Prepare and Configure Developer Workstation (Windows)
To begin using the vRealize Build Tools, the developer’s workstation has to be prepared with the required prerequisites met. Note that I am preparing a Windows 10 workstation so if you are using a Mac or Linux, then you may have to seek alternative guidelines on completing these steps.
Prepare Developer Workstation
The following sections will detail the software requirements and configuration that is needed to allow your workstation to build packages for vRO.
Install Java Development Kit (JDK)
Maven will only work with Java JDK installed (not Java Runtime Environment (JRE)) but the JRE is also included. You will need to install Java JDK version 8, which can be downloaded directly from Oracle: https://www.oracle.com/technetwork/java/javase/downloads/index.html.
Once this has been installed, you will need to set the JAVA_HOME environment variable to point to the installation path of the JDK.
Open a command prompt and issue the following command, replacing the JDK path with your own.
setx JAVA_HOME "C:\Program Files\Java\jdk1.8.0_211"
You will also need to add the JDK bin directory to the system path.
Open a command prompt as an Administrator and issue the following command.
setx PATH "%PATH%;%JAVA_HOME%\bin"
Install Apache Maven
Apache Maven is used for managing and building projects, based on the Project Object Model (POM). Download the Maven binary package from https://maven.apache.org/download.cgi.
The binary package does not include an installer so extract to a directory, that does not include any spaces. (I have mine at D:\apache-maven\3.6.1).
Add the Maven bin directory to the environment path. Open a command prompt as an Administrator and issue the following command, replacing the maven bin path with your own.
setx PATH "%PATH%;"D:\apache-maven\3.6.1\bin"
Verify that you can execute Maven by displaying the version.
mvn -version
Create a Project Directory
Create a project directory that will be used to store all the development files. I typically have a ‘projects’ folder in my users’ home directory and have created a folder called vRO-vRA within it i.e. ‘C:\Users\Gavin\projects\vRO-vRA\’.
Create Java Keystore
All packages need to be signed during build time, using a Java Keystore file. Open a command prompt and navigate to the root of your project directory (not where the code will live). Issue the following command to create the Java keystore file, replacing with your details:
cd C:\Users\Gavin\projects\
keytool -genkey -keyalg RSA -keysize 2048 -alias '_dunesrsa_alias_' -keystore package.jks -storepass 'VMware1!' -validity 3650 -dname 'CN=Project,OU=Department,O=Company,L=City,ST=State,C=XX,emailAddress=administrator@vsphere.local'
Create a Master Password
Maven allows encrypted server passwords to be stored in the settings.xml file. Before Maven can do this, it requires that a master password first be set. This is achieved using the ‘mvn –encrypt-master-password‘ command, that will prompt you to enter the password that will be encrypted:
mvn --encrypt-master-password
You will need to store this encrypted string in the ‘%USERPROFILE%/.m2/settings-security.xml‘ file. If this does not already exist, then create it as follows:
<settingsSecurity>
  <master>{sMFA/2y5+qAHjPPmlxkFj1tcWbU6CGKwm3t1dA1eGSo=}</master>
</settingsSecurity>
Configure Project Settings (settings.xml)
You will need to create a ‘%USERPROFILE%/.m2/settings.xml‘ file that is based on the below template (taken directly from the vRealize Build Tools documentation, with a correction to the vro.auth tag), ensuring to replace all the {} placeholders with your values.
<?xml version="1.0" encoding="UTF-8"?>
<settings xsi:schemaLocation="http://maven.apache.org/SETTINGS/1.1.0 http://maven.apache.org/xsd/settings-1.1.0.xsd"
    xmlns="http://maven.apache.org/SETTINGS/1.1.0"
    xmlns:xsi="http://www.w3.org/2001/XMLSchema-instance">
    <servers>
        <server>
            <username>{vro_username}</username>
            <password>{native+maven+encrypted+pass}</password>
            <id>corp-dev-vro</id>
        </server>
        <server>
            <username>{vra_username}</username>
            <password>{native+maven+encrypted+pass}</password>
            <id>corp-dev-vra</id>
        </server>
    </servers>
    <profiles>
        <profile>
            <id>packaging</id>
            <properties>
                <keystorePassword>{keystore_password}</keystorePassword>
                <keystoreLocation>{keystore_location}</keystoreLocation>
            </properties>
        </profile>
        <profile>
            <id>bundle</id>
            <properties>
                <assembly.skipAssembly>false</assembly.skipAssembly>
            </properties>
        </profile>
        <profile>
            <id>artifactory</id>
            <repositories>
                <repository>
                    <snapshots><enabled>false</enabled></snapshots>
                    <id>central</id>
                    <name>central</name>
                    <url>http://{artifactory-hostname}/artifactory/{release_repository}</url>
                </repository>
                <repository>
                    <snapshots><enabled>true</enabled></snapshots>
                    <id>central-snapshots</id>
                    <name>central-snapshots</name>
                    <url>http://{artifactory-hostname}/artifactory/{snapshot_repository}</url>
                </repository>
            </repositories>
            <pluginRepositories>
                <pluginRepository>
                    <snapshots><enabled>false</enabled></snapshots>
                    <id>central</id>
                    <name>central</name>
                    <url>http://{artifactory-hostname}/artifactory/{release_repository}</url>
                </pluginRepository>
                <pluginRepository>
                    <snapshots><enabled>true</enabled></snapshots>
                    <id>central-snapshots</id>
                    <name>central-snapshots</name>
                    <url>http://{artifactory-hostname}/artifactory/{snapshot_repository}</url>
                </pluginRepository>
            </pluginRepositories>
            <properties>
                <releaseRepositoryUrl>http://{artifactory-hostname}/artifactory/{release_repository}</releaseRepositoryUrl>
                <snapshotRepositoryUrl>http://{artifactory-hostname}/artifactory/{snapshot_repository}</snapshotRepositoryUrl>
            </properties>
        </profile>
        <profile>
            <!--Environment identifier. Multiple environments are allowed by configuring multiple profiles -->
            <id>corp-dev</id>
            <properties>
                <!--vRO Connection-->
                <vro.host>{vro_host}</vro.host>
                <vro.port>{vro_port}</vro.port>
                <vro.username>{vro_username}</vro.username> <!--NOT RECOMMENDED USE vro.serverId and encrypted credentials-->
                <vro.password>{vro_password}</vro.password> <!--NOT RECOMMENDED USE vro.serverId and encrypted credentials-->
                <vro.serverId>corp-dev-vro</vro.serverId>
                <vro.auth>{basic|vra}</vro.auth>
                <vro.tenant>{vro_tenant}</vro.tenant>
                <!--vRA Connection-->
                <vra.host>{vra_host}</vra.host>
                <vra.port>{vra_port}</vra.port>
                <vra.tenant>{vra_tenant}</vra.tenant>
                <vra.serverId>corp-dev-vra</vra.serverId>
                <vra.username>{vra_username}</vra.username> <!--NOT RECOMMENDED USE vra.serverId and encrypted credentials-->
                <vra.password>{vra_password}</vra.password> <!--NOT RECOMMENDED USE vra.serverId and encrypted credentials-->
                <!--Ignore certificate errors if using self signed certificates-->
                <vrealize.ssl.ignore.hostname>true</vrealize.ssl.ignore.hostname>
                <vrealize.ssl.ignore.certificate>true</vrealize.ssl.ignore.certificate>
            </properties>
        </profile>
    </profiles>
    <activeProfiles>
        <activeProfile>artifactory</activeProfile>
        <activeProfile>packaging</activeProfile>
    </activeProfiles>
</settings>
The ‘{native+maven+encrypted+pass}‘ is the encrypted password, which you can generate using the ‘mvn –encrypt-password‘ command.
mvn --encrypt-password
Install Visual Studio Code
Now we’re on to the good stuff. If you don’t already have it installed, then go ahead and install Visual Studio Code. My post on Using Visual Studio Code for your vRealize Orchestrator Development can help you out here if you need an overview or guidance.
Install vRealize Developer Tools Extension
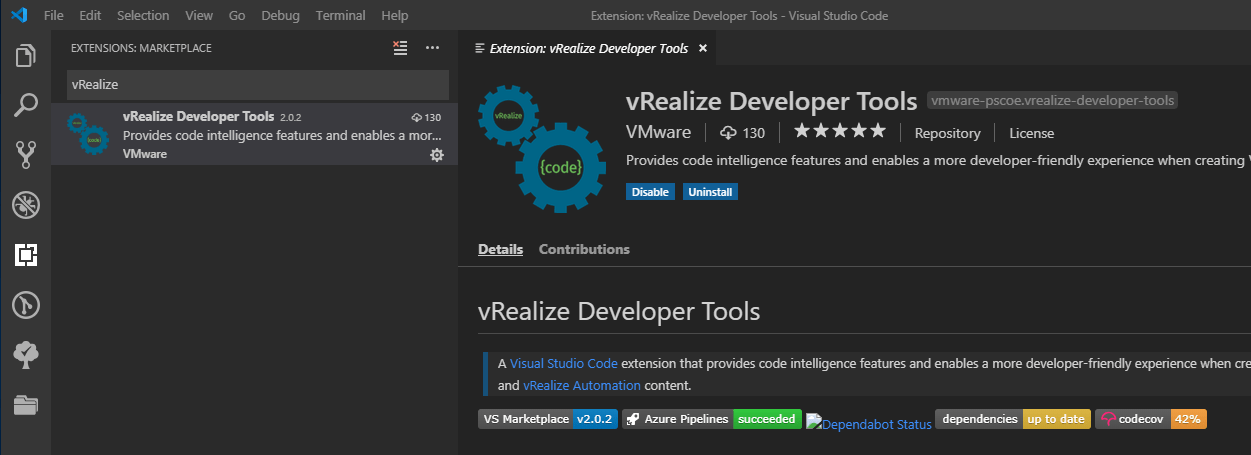
The next step is to install the vRealize Developer Tools extension. With Visual Studio Code open, click on the extension’s icon and search for vRealize Developer Tools and install the extension.
Make sure to restart Visual Studio Code after the extension has been installed as I had issues when I didn’t do this.
Next, open the project folder for your vRO code (if you recall earlier we created a ‘projects’ folder and a subfolder to hold all your vRO code). I use the project folder ‘%USERPROFILE%\projects\vRO-vRA‘.
Using The vRealize Build Tools
This section will detail how you can begin creating new projects, load your maven profile and push content to the vRO server.
Create Your First Project
The extension won’t activate at first, because the project folder is currently empty. Start by creating a new vRealize project by pressing CTRL+SHIFT+P and search for the command vRealize: New Project.
Select the ‘vRO JavaScript-based‘ project.
Provide a group ID for the project.
Finally, provide a name for the project. The group ID and the name combined form the module name that you would see in the vRO client under Actions.
You will then be prompted where to create this new project. It should default to your project folder so just click ‘Create Here‘.
You may encounter an error at this stage if you are running Visual Studio Code in Windows.
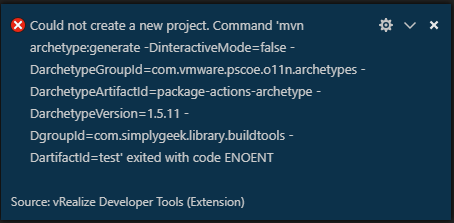
There appears to be a bug in the command string that will prevent the project from being created. If you also run into this problem then you will have to create the project on the command line using Maven. You can simply copy the command that is provided in the error.
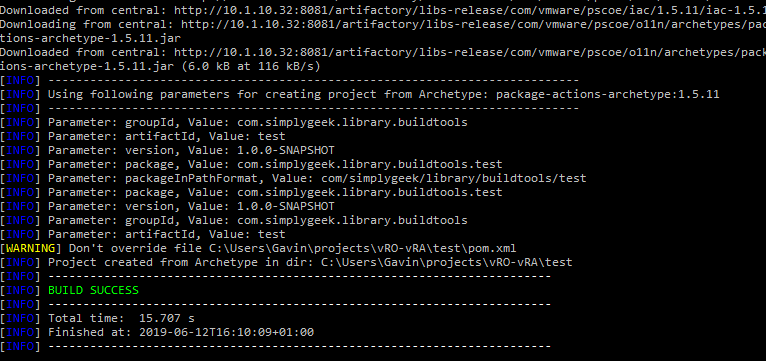
mvn archetype:generate -DinteractiveMode=false -DarchetypeGroupId=com.vmware.pscoe.o11n.archetypes -DarchetypeArtifactId=package-actions-archetype -DarchetypeVersion=1.5.11 -DgroupId=com.simplygeek.library.buildtools -DartifactId=test
Then just open a command prompt to your project folder and execute the command. You will see all the artefacts being downloaded from Artifactory and hopefully that the build completed successfully:
Load Profile and Download Hints
Switch back to Visual Studio Code and you should now see that the vRealize Developer Tools extension has loaded for this project. This can be identified from the profiles icon in the bottom left side of the IDE ![]()
Click on this icon and select the profile you would like to work with (this is the profile that was configured in the settings.xml file).
The status bar in the bottom left will change and your selected profile will be displayed. A cloud icon will also now appear. This is used to trigger a hints collection against the vRO server. If you recall earlier, you installed the hints plugin on the vRO server. This will download information about all the installed plugins and vRO intrinsic functions.
Click the hints icon to invoke a hints collection.
In the Output window in Visual Studio Code for vRO – Language Server, you will see the hints collection being processed.
You will now get IntelliSense when developing code for vRO and using plugins.
Push Package to vRO
Perform this task on the first project that you created as a test to ensure that you can promote packages to the vRO server. From the command line, move into the new project directory and execute the following command:
cd test
mvn package vrealize:push -Pdevelopment
Where ‘test‘ is the name of the project created earlier and ‘development‘ is your profile name.
Providing that everything has been set up correctly, the build should be successful:
And the package should now be visible in vRO, with a sample action in the correct module.
If you got this far and everything has worked then well done. There is still much more to cover and I’ll be working on several followup posts exploring more than can be achieved using these build tools. I’ll also look at how we can effectively manage projects and code and look at unit testing using Jasmine.
Thanks for reading and I hope that this post has been useful. If you have any problems getting these tools to work, then please drop me a message and I will do what I can to help.










[…] Deploying vRealize Build Tools To Allow Infrastructure As Code for vRA and vRO […]
After setting everything up as you suggested, maven throws following errors – “C:\Users\s98681s\Projects\vRO>mvn archetype:generate -DinteractiveMode=false -DarchetypeGroupId=com.vmware.pscoe.o11n.archetypes -DarchetypeArtifactId=package-actions-archetype -DarchetypeVersion=1.5.11 -DgroupId=com.bcbst.vmteam -DartifactId=test [INFO] Scanning for projects… [WARNING] The POM for org.apache.maven.plugins:maven-clean-plugin:jar:2.5 is missing, no dependency information available [WARNING] Failed to retrieve plugin descriptor for org.apache.maven.plugins:maven-clean-plugin:2.5: Plugin org.apache.maven.plugins:maven-clean-plugin:2.5 or one of its dependencies could not be resolved: Failure to find org.apache.maven.plugins:maven-clean-plugin:jar:2.5 in http://rn002061.bcbst.com:8081/artifactory/libs-release was cached in the local repository, resolution will not be reattempted until the update interval of central has elapsed or updates are forced [WARNING] The POM for org.apache.maven.plugins:maven-install-plugin:jar:2.4 is missing, no dependency information available [WARNING] Failed to retrieve plugin descriptor… Read more »
Hi Sagar. Sorry to hear that you are having problems. Can you confirm that you are able to access http://repo1.maven.org/maven2/org/apache/maven/plugins/maven-clean-plugin/2.5/maven-clean-plugin-2.5.jar from a web browser? If this works, is your web browser sitting behind a proxy? If this is the case you will need to configure the proxy settings in your settings.xml using this guide: http://maven.apache.org/guides/mini/guide-proxies.html
I did try that. Here’s my settings.xml file –
”
vroast
{6/rVE459MO0HwnyR6UMIWBWJB/DD4ajkXRBW7Mk6dW4=}
corp-dev-vro
packaging
{VMware1!}
C:\Users\s98681s\Projects\vRO\package.jks
bundle
false
artifactory
false
central
central
http://rn002061.bcbst.com:8081/artifactory/libs-release
true
central-snapshots
central-snapshots
http://rn002061.bcbst.com:8081/artifactory/libs-snapshot
false
central
central
http://rn002061.bcbst.com:8081/artifactory/libs-release
true
central-snapshots
central-snapshots
http://rn002061.bcbst.com:8081/artifactory/libs-snapshot
http://rn002061.bcbst.com:8081/artifactory/libs-release
http://rn002061.bcbst.com:8081/artifactory/libs-snapshot
corp-dev
10.248.4.28
8281
corp-dev-vro
basic
vsphere.local
true
true
artifactory
packaging
optional
true
http
v38250s
YUg5eSj5Lc5X
webproxy.bcbst.com
80
bclab.com|bcbst.com
“
And are you able to access this plugin from your artifactory: http://rn002061.bcbst.com:8081/artifactory/libs-release/org/apache/maven/plugins/maven-clean-plugin/2.5/maven-clean-plugin-2.5.jar
I can’t access that in my browser since I have ended up with a folder “com” and “archetype-catalog.xml” file in “lib-release” repository after following your guide
I think I understand the problem now. Your Artifactory has not downloaded the Maven artifacts from repo1. Have you configured the proxy settings within Artifactory itself under Admin -> Proxies?
I got a little far this time. After setting proxy in Artifactory server, I was able to execute the new project command in mvn. Then when I tried getting vRO hint collection, it errored out saying missing vro.username field in profile. So I hard coded the credentials and that finished fine. When I try to push the project to vRO, its erroring out – “C:\Users\s98681s\Projects\vRO\test>mvn package vrealize:push -Pdevelopment [INFO] Scanning for projects… Downloading from central: http://rn002061.bcbst.com:8081/artifactory/libs-release/org/apache/logging/log4j/log4j-api/2.10.0/log4j-api-2.10.0.jar Downloading from central: http://rn002061.bcbst.com:8081/artifactory/libs-release/org/apache/logging/log4j/log4j-core/2.10.0/log4j-core-2.10.0.jar Downloading from central: http://rn002061.bcbst.com:8081/artifactory/libs-release/org/apache/logging/log4j/log4j-slf4j-impl/2.10.0/log4j-slf4j-impl-2.10.0.jar Downloading from central: http://rn002061.bcbst.com:8081/artifactory/libs-release/org/jboss/spec/javax/transaction/jboss-transaction-api_1.2_spec/1.0.1.Final/jboss-transaction-api_1.2_spec-1.0.1.Final.jar Downloading from central-snapshots: http://rn002061.bcbst.com:8081/artifactory/libs-snapshot/org/jboss/spec/javax/transaction/jboss-transaction-api_1.2_spec/1.0.1.Final/jboss-transaction-api_1.2_spec-1.0.1.Final.jar Downloading from central-snapshots: http://rn002061.bcbst.com:8081/artifactory/libs-snapshot/org/apache/logging/log4j/log4j-core/2.10.0/log4j-core-2.10.0.jar Downloading from central-snapshots: http://rn002061.bcbst.com:8081/artifactory/libs-snapshot/org/apache/logging/log4j/log4j-slf4j-impl/2.10.0/log4j-slf4j-impl-2.10.0.jar… Read more »
Did you manage to get any further with this? I’m wondering if perhaps all the artifacts were not fully sync’d with Artifactory when you re-attempted.
I did try that but still getting same error. We are behind a proxy so set my XML with the link you mentioned, but no success still. Thanks for looking into this.
Two points here:
In setting.xml specify maven compiler version to 1.7
Also in maven’s settings.xml create a mirror of * or central and point it to https://repo1.maven.org/maven2
[…] IaC for vRealize: Deploying vRealize Build Tools To Allow Infrastructure As Code for vRA and vRO […]
Hi Gavin,
Thanks for the great post.
I followed the steps, but when try to push a test package to the vRO I’m receiving an error: ERROR] Failed to execute goal com.vmware.pscoe.maven.plugins:vrealize-package-maven-plugin:1.5.11:push (default-cli) on project testProject2: Execution default-cli of goal com.vmware.pscoe.maven.plugins:vrealize-package-maven-plugin:1.5.11:push failed: 401 -> [Help 1]
I suspect it is because of an wrong credentials provided in the settings.xml.
Can you please advise if this can be the issue?
What should be the and in the part
Any luck on this? I have the same issue. My VRO connection is setup correctly because I can pull hints without an issue.
I encountered an issue myself that I needed to provide both the encrypted password and the plain text password. I have raised this issue. Can you confirm if you are also using both?
Any updates regarding this comment. I am also getting 401 error for pull and push commands and would love if anyone has found a solution.
This issue cannot be avoided and you need specific vRO artefacts from the 7.3 appliance (I haven’t checked in a while to see if this has changed) I previously updated my post to include: The documentation provided with the vRealize Build Tools asks for artefacts to be pulled from a vRO 7.3 appliance. You will need to standup a vRO 7.3 appliance in which to extract these artefacts. The vRealize Build Tools do not support any other version, regardless of which vRO appliance version you are working with. Huge thanks to Jeff White for pointing this out. The vRO 7.3 artefacts have… Read more »
Just as a heads up as part of my install i had to enable Annon Access globally in JFROG (https://www.jfrog.com/confluence/display/RTF/Configuring+Security) after this the projects bulit fine.
Thanks, Eric. I will update this post with these details.
Hello Gavin,
I am Getting the issue below:
[INFO] ————————————————————————
[ERROR] Failed to execute goal org.apache.maven.plugins:maven-archetype-plugin:3.1.2:generate (default-cli) on project standalone-pom: The desired archetype does not exist (com.vmware.pscoe.o11n.archetypes:package-actions-archetype:1.5.11) -> [Help 1]
Do you know what causes that? Do you know if I missed a step?
Hey Sean. It does look like you may have missed a step. Can you browse the artifactory repo and verify if these artifacts exist. Also check that the files exist in the virtual container and that it has been added to the release repo
Hi Gaven, thanks for the detailed steps. I managed to get through most of the steps and I am having an issue on the step to push the code to vRO : C:\Users\win2k3ad\projects\vRO-vRA\test01>mvn package vrealize:push -P corp-dev [INFO] Scanning for projects… [WARNING] The POM for org.mozilla:rhino:jar:1.7R4 is missing, no dependency information available [WARNING] The POM for com.vmware.o11n:o11n-model:jar:7.3.1 is missing, no dependency information available [WARNING] The POM for com.google.guava:guava:jar:23.0 is missing, no dependency information available [WARNING] The POM for org.apache.logging.log4j:log4j-api:jar:2.10.0 is missing, no dependency information available [WARNING] The POM for org.apache.logging.log4j:log4j-core:jar:2.10.0 is missing, no dependency information available [WARNING] The POM for… Read more »
Hi Bassam. It looks like your artifactory server isn’t able to download artifacts from the online repo. Does it have access to the Internet? If not, you may need to configure outbound proxy access
Sorry, inbound access :)
I did configure a proxy for artifactory server as you suggested in teh tutorial :(
Can you browse the artifactory repo and verify if these files exist?
only the com.vmware ….. exists in the libs-release repository.
It looks like the artifactory is not trying to fetch the external dependencies from internet or may be it is trying and failing but I don’t know the location of the logs to troubleshoot this
Hi Bassam. I am not sure. Do you have access to the proxy server that you are using? Perhaps it needs to whitelist the repo that Artifactory is trying to reach.
Thanks Gavin, we are progressing here :)
So the global proxy settings was not taken into account for some reason. The global proxy account is here : Admin >> Configuration >> Proxies.
I had to set it also here : Admin >> Repositories >> Remote >> jcenter >> advanced >> Network >> Proxy.
So now the dependencies seems to be downloaded from internet and libs-release repo is now populated.
When I retry the mvn packaging … step, I have only one error now :
[WARNING] The POM for com.vmware.cafe:cafe-sdk:jar:7.3.1 is missing, no dependency information available
Good find and I’ll update the post with that new info. It can take some time for the repo to fully populate. Have you tried again since?
Yes, I retried, I have fewer errors, actually only one is remaining and seems to be related to vmware : C:\Users\win2k3ad\projects\vRO-vRA\test03>mvn package vrealize:push -Pcorp-dev [INFO] Scanning for projects… [WARNING] The POM for com.vmware.cafe:cafe-sdk:jar:7.3.1 is missing, no dependency information available [ERROR] [ERROR] Some problems were encountered while processing the POMs: [ERROR] Unresolveable build extension: Plugin com.vmware.pscoe.maven.plugins:o11n-actions-package-maven-plugin:1.5.11 or one of its dependencies could not be resolved: Failure to find com.vmware.cafe:cafe-sdk:jar:7.3.1 in http://dvbrxart01.brmc.lab:8081/artifactory/libs-release was cached in the local repository, resolution will not be reattempted until the update interval of central has elapsed or updates are forced @ [ERROR] Unknown packaging: package @ line… Read more »
I just setup a vRA 7.3.0 and managed to make it work. SO it looks like there is an issue with 7.3.1. I was excited to use this for my future deliveries, but as my current production env is 7.3.1, I won’t be able to make it :'(
Any idea if 7.3.1 will be supported any time soon ?
Yay ! found a way to make it work with 7.3.1 : Just do not make any change on the step https://www.simplygeek.co.uk/2019/06/12/deploying-vrealize-build-tools-to-allow-infrastructure-as-code-for-vra-and-vro/#Modify_POM_Files_For_vRO_Version , just keep 7.3.0 on the POM files and it will still work with version 7.3.1 :D
Great work! Thanks for letting me know.
Hi Bassam. I missed that you asked about the release_repository. Here is how my Artifactory profile looks in settings.xml
artifactory
false
central
central
http://10.1.10.32:8081/artifactory/libs-release
true
central-snapshots
central-snapshots
http://10.1.10.32:8081/artifactory/libs-snapshot
false
central
central
http://10.1.10.32:8081/artifactory/libs-release
true
central-snapshots
central-snapshots
http://10.1.10.32:8081/artifactory/libs-snapshot
http://10.1.10.32:8081/artifactory/libs-release
http://10.1.10.32:8081/artifactory/libs-snapshot
This is excellent Gavin. After two days of fighting I finally got it to work in our hulking enterprise architecture! The docs are… painful, so your guide was literally the only thing keeping me going. Three things. First, if you go in to the extension settings, you can modify the version number of the build tools. This is actually sort of important later because then it creates the pom files in the right spot. Dunno if you want to update that, since then you don’t have to use the CLI, and you can create a new project right in vscode.… Read more »
Regarding the “error if you are running Visual Studio Code in Windows. There appears to be a bug in the command string that will prevent the project from being created. If you also run into this problem then you will have to create the project on the command line using Maven. You can simply copy the command that is provided in the error.”, the error disappears if you install the visual studio code extension “Maven for Java” from Microsoft.
If someone else can validate this and advise.
If you get this error: “java.io.IOException: Invalid keystore format”
Try to use propietary JKS format for keystore: “keytool -storetype JKS -genkey …”
THanks for the info Jose!
Hi Gavin,
Thank you for the article.
However, is Artifactory mandatory if we want to try localy?
Best Regards.
Hi Ant
No, it’s not mandatory and you would be fine to use the local repo on your desktop for example.
@gavin
1. With the recent release I do not find the hint plugin. Can you please provide a link to download it?
2. While packaging I am getting the following error:
[ERROR] Failed to execute goal com.vmware.pscoe.maven.plugins:o11n-actions-package-maven-plugin:2.12.5:package (default-package) on project demo: Execution default-package of goal com.vmware.pscoe.maven.plugins:o11n-actions-package-maven-plugin:2.12.5:package failed: An API incompatibility was encountered while executing com.vmware.pscoe.maven.plugins:o11n-actions-package-maven-plugin:2.12.5:package: java.lang.IllegalAccessError: class ch.dunes.model.pkg.impexp.BasePackageFileManager (in unnamed module @0x73633230) cannot access class sun.security.x509.X500Name (in module java.base) because module java.base does not export sun.security.x509 to unnamed module @0x73633230
Hi Gavin,
How can I fix the issue with package pull?
[…] my first post, that we prepared and uploaded the vRealize artefacts, which you can take a look at here to refresh your memory. In that post, we staged the artefacts inside a local folder on the […]
Hello,
We recently upgraded to vRA 8.12 (Aria Automation). Is this way-of-working described here still valid?
Hi Bart. I am pleased to let you know that an updated version is now available here: https://www.simplygeek.co.uk/2024/01/18/build-tools-for-vmware-aria-getting-up-and-running/
[…] development in Aria Automation Orchestrator and a lot has changed since I covered it in my ‘IaC for vRealize‘ series of posts. Many people have been asking and I finally had some time to write an […]