Automation
Getting Started with Ansible Development on Windows Using WSL and Visual Studio Code

Page Contents
Windows Subsystem for Linux (WSL) lets you run Ansible and other Linux tools while working on a Windows desktop. Visual Studio Code (VS Code) connects to that Linux environment, so you can edit files, use Git and run commands from one editor.
This guide sets up AlmaLinux 10 in WSL 2, creates a Python virtual environment and connects it to the Ansible extension in VS Code. The result is a workspace with code completion, syntax highlighting, YAML validation and linting, plus access to the Ansible command-line tools.
WSL 2 runs a Linux kernel inside a lightweight virtual machine managed by Windows. You do not need to configure a separate virtual machine or dual-boot installation. See Microsoft’s comparison of WSL versions for the architectural differences.
The screenshots come from the original July 2025 article. They illustrate the setup, but current extension screens and settings can differ. Use the updated commands and configuration below when following the guide.
Prerequisites
- Windows 11, with administrator access to install WSL. Microsoft’s WSL installation guide also covers Windows 10 version 2004, build 19041 and later.
- Visual Studio Code installed on Windows. The WSL extension installs the required server components inside Linux.
- Internet access from Windows and WSL to download the distribution, extensions and Python packages.
- Basic familiarity with a terminal and Ansible playbooks.
The examples use AlmaLinux 10 and its Python 3.12 packages. My preference remains AlmaLinux for its compatibility with Red Hat Enterprise Linux. Ubuntu is another option, but its package installation commands differ. You can install more than one WSL distribution.
Check Python compatibility when choosing another distribution. The current ansible-dev-tools package metadata requires Python 3.11 or later, while individual tools can have stricter requirements. The ansible-core support matrix lists supported controller Python versions. AlmaLinux 10 supplies Python 3.12.
Install Windows Subsystem for Linux
Run the commands in this section in PowerShell on Windows. The later Linux commands run inside AlmaLinux.
-
Open PowerShell as an administrator and list the available distributions:
wsl --list --onlineDistribution names change over time. Use the exact name returned by this command. If WSL is unavailable on an older Windows installation, follow Microsoft’s manual installation instructions.
-
Install AlmaLinux 10:
wsl --install -d AlmaLinux-10Restart Windows if prompted, then open AlmaLinux to finish its initial setup. Create a Linux username and password when asked. The Linux username does not need to match your Windows username.
-
Check that the distribution uses WSL 2:
wsl --list --verboseThe
VERSIONcolumn forAlmaLinux-10should show2. If it shows1, convert that distribution:wsl --set-version AlmaLinux-10 2 -
Open the distribution explicitly:
wsl -d AlmaLinux-10This avoids opening a different distribution when another one is the default.
In the AlmaLinux terminal, update the packages and install Git, Python and pip:
sudo dnf update -y
sudo dnf install git python3 python3-pip -y
python3 --version
These package commands are for AlmaLinux. Follow your distribution’s package instructions if you use Ubuntu or another Linux distribution.
Create an environment for Ansible development
A Python virtual environment gives this setup its own Python packages. It keeps the Ansible tools separate from the packages installed by the operating system.
Keep the environment and project files in the Linux file system, such as your Linux home directory. Microsoft recommends this for performance when using Linux tools. Your starting directory depends on how you open WSL, so switch to your home directory first.
-
In the AlmaLinux terminal, create the environment:
cd ~ mkdir -p venv python3 -m venv venv/ansible-dev -
Activate it:
source ~/venv/ansible-dev/bin/activateThe prompt usually gains an
(ansible-dev)prefix. Check the interpreter directly if your shell theme does not show it:python -c "import sys; print(sys.executable)"The path should end in
/venv/ansible-dev/bin/pythonbeneath your Linux home directory. -
Upgrade pip within the environment, then install the development tools:
python -m pip install --upgrade pip
python -m pip install ansible-dev-tools
Ansible Development Tools packages tools for working with playbooks, roles, collections and plugins. Using
python -m pipties the installation to the active interpreter. Run these commands as your normal Linux user, withoutsudo. -
Check the installed tools and their versions:
adt --version
ansible --version
ansible-lint --version
Keep the version information when troubleshooting. The available tool versions depend on the package release and Python interpreter you installed.
This guide uses the tools directly from the virtual environment. Running container-based tools or Ansible execution environments also requires a container engine, which is outside this setup.
Set up Visual Studio Code
A dedicated VS Code profile helps keep your Ansible extensions and settings together. It is optional, but useful when you work with several development environments.
- Open the Manage menu using the cog icon, then select Profiles.
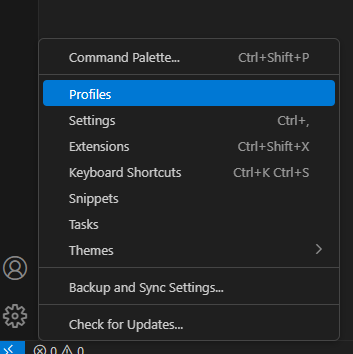
- Select New Profile.

-
Name the profile
Ansible, select Create, and make sure the profile is active. Extensions and settings you add now belong to that profile, subject to any settings it shares with another profile. -
Open Extensions and install the WSL extension from Microsoft on the Windows side.
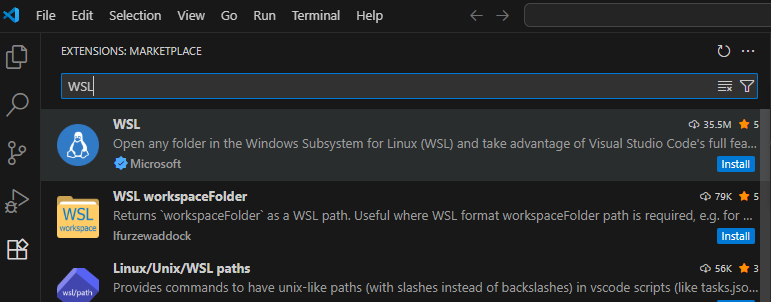
-
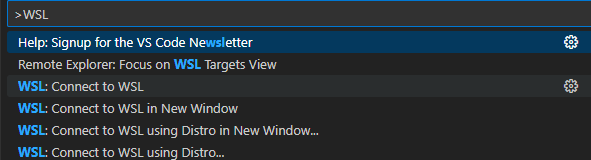
Press Ctrl+Shift+P or F1 to open the Command Palette. Run WSL: Connect to WSL using Distro, then choose
AlmaLinux-10.If AlmaLinux is already your default distribution, WSL: Connect to WSL also works. The original screenshot shows this default-distribution option.
-
Wait for VS Code to install its server components. Check the WSL indicator in the status bar to confirm that the window is connected to AlmaLinux.
-
In that WSL window, install Ansible from Red Hat. Also check that the Python extension from Microsoft and YAML extension from Red Hat are installed in WSL. If VS Code offers Install in WSL, use it.
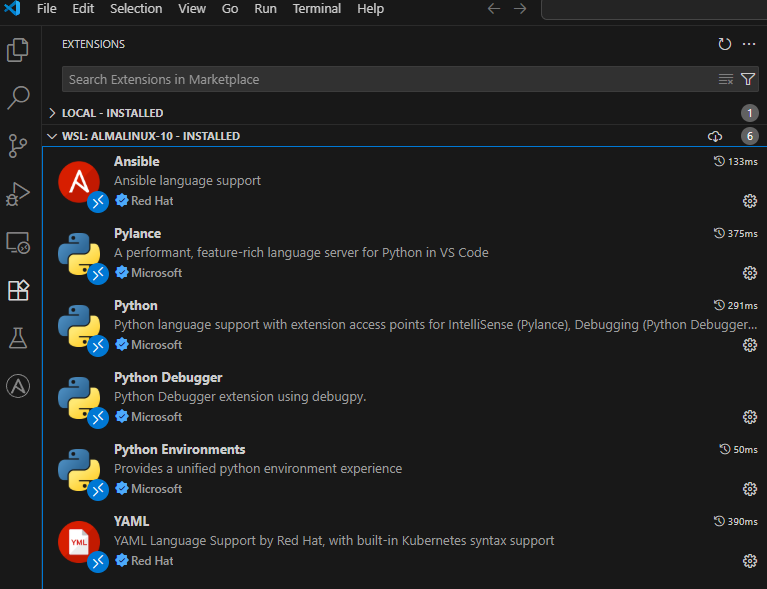
The editor runs on Windows, while the tools and extensions that need Linux run inside WSL. Microsoft’s Developing in WSL guide explains this arrangement, including terminals, Git and debugging.
Create and configure the workspace
Save a workspace so you can reuse the configuration across your Ansible projects.
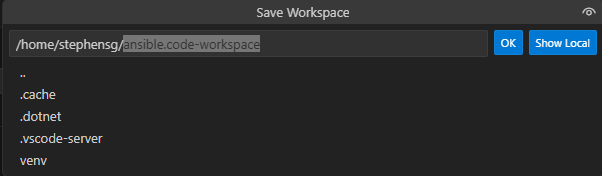
- Select File > Save Workspace As… and save it as
ansible.code-workspacein your Linux home directory.
- Open the Command Palette and select Preferences: Open Workspace Settings (JSON).

-
Add the following properties inside the existing
settingsobject. Preserve any existing workspace folders and other settings.Replace
stephensgin all four paths with your Linux username. Use absolute Linux paths, not Windows paths or a literal~.{ "ansible.python.interpreterPath": "/home/stephensg/venv/ansible-dev/bin/python", "ansible.ansible.path": "/home/stephensg/venv/ansible-dev/bin/ansible", "ansible.validation.lint.enabled": true, "ansible.validation.lint.path": "/home/stephensg/venv/ansible-dev/bin/ansible-lint", "ansible.executionEnvironment.enabled": false, "python.defaultInterpreterPath": "/home/stephensg/venv/ansible-dev/bin/python", "python.terminal.activateEnvironment": true, "files.associations": { "*.yml": "ansible", "*.yaml": "ansible" } }The braces show the contents of the
settingsobject. Do not nest a second object inside it. The following screenshot shows the older configuration, not the exact settings above.
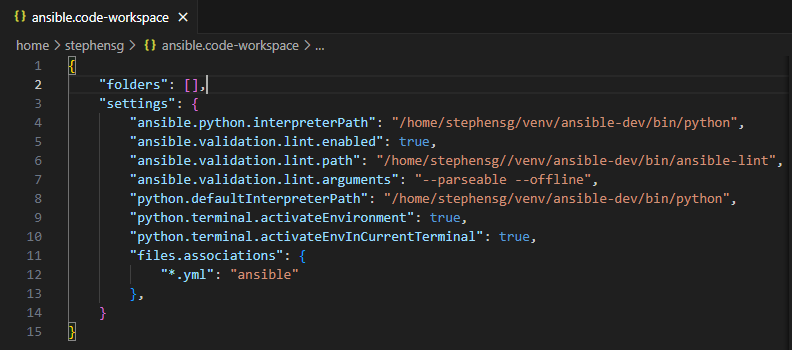
The Ansible extension settings point Ansible, Python and ansible-lint at the same environment. Disabling execution environments makes this configuration use those local Linux tools.
The file associations apply Ansible language support to both .yml and .yaml files in this dedicated workspace. They do not make every YAML file an Ansible file. For a workspace containing other YAML formats, use narrower patterns or choose Ansible as the language mode for individual files. See the extension’s file association guidance.
The original configuration passed --parseable --offline to ansible-lint. This setup leaves output formatting to the extension and does not force offline mode. Add --offline only when you intend to skip dependency installation and have prepared the project’s dependencies. See the Ansible Lint options.
Add projects and select the Python interpreter
-
In WSL, place your projects in a directory such as
~/ansible-projects. Copy an existing project, clone it with Git, or create a role withansible-galaxy.The original example uses
ansible-role-vmware-aviinsideansible-projects. You can use your own project instead. -
In VS Code, select File > Add Folder to Workspace…, choose the project directory, then select Add.

-
Run Python: Select Interpreter from the Command Palette. Select the interpreter at
/home/stephensg/venv/ansible-dev/bin/python, substituting your username. If it is not listed, use Enter interpreter path…. Repeat for each project folder when VS Code asks which folder to configure.Setting
python.defaultInterpreterPathdoes not replace an interpreter you previously selected. Microsoft’s Python settings reference documents this behaviour. -
Open a new integrated terminal and check the active interpreter:
python -c "import sys; print(sys.executable)"It should point to
ansible-dev. If it does not, activate the environment in that terminal:source ~/venv/ansible-dev/bin/activate
The Python extension can activate the selected environment when you create a terminal. If you use the newer Python Environments extension, its python-envs.terminal.autoActivationType setting takes precedence. Set it to command if automatic activation is disabled. Reopen the terminal after changing the setting.
Verify the development environment
Check that the integrated terminal uses the expected virtual environment. The original terminal screenshot shows the (ansible-dev) prompt.

From your project directory in that terminal, run:
ansible --version
ansible-lint --version
ansible-lint
The version commands should find the installed tools. The lint command checks your project and may report findings that need attention. A lint failure in an existing project does not, by itself, mean the environment is configured incorrectly.
Open an Ansible YAML file and check that its language mode is Ansible. Save the file and inspect the editor diagnostics and Problems panel.
I used an older project that predates Ansible collections to demonstrate the lint findings in the original screenshots.
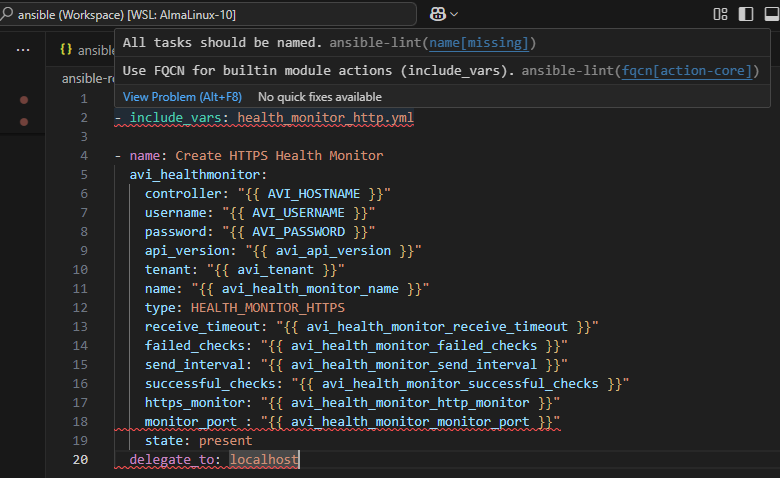
The Problems panel lists the diagnostics for the file.
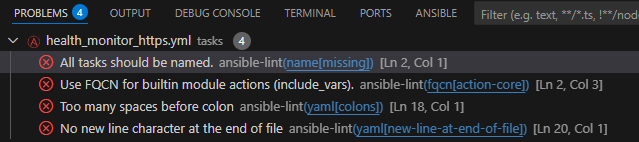
The next screenshot shows IntelliSense suggesting a fully qualified collection name (FQCN) for a module. An FQCN identifies the namespace, collection and module, such as ansible.builtin.copy. See the Ansible Lint FQCN rule.
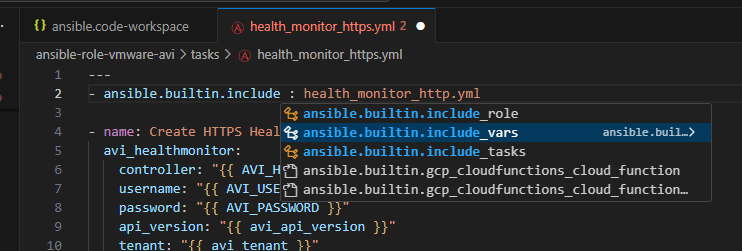
Syntax highlighting helps distinguish the YAML structure, while completion and lint diagnostics help you find issues as you edit. You can extend this setup with other extensions, Python linting or project-specific ansible-lint configuration.
Troubleshooting
| Symptom | What to check |
|---|---|
| VS Code opens the wrong Linux distribution | Use WSL: Connect to WSL using Distro and select AlmaLinux-10. |
python3 is missing |
Run the AlmaLinux package installation command in the Linux terminal. |
| Package installation reports an unsupported Python version | Check python3 --version and the package requirements. Recreate the environment with a supported interpreter. |
Ansible or ansible-lint is not found |
Check the absolute paths in workspace settings and confirm that the tools are installed in ansible-dev. |
| A new terminal uses the wrong Python interpreter | Run Python: Select Interpreter, reopen the terminal and check automatic activation settings. |
| A YAML file has no Ansible completion or lint diagnostics | Check its language mode, the WSL extension installation and ansible.validation.lint.enabled. |
| Linting reports missing collections or roles | Install the project’s declared dependencies in this environment. Offline mode skips dependency installation. |
References
Related articles

How I Write Beautiful Code in VCF Operations Orchestrator using ESLint and Prettier
Configure ESLint and Prettier for Orchestrator JavaScript development, including command-line checks, VS Code formatting and performance tuning.
VCF Automation – Build Tools for VMware Aria – Visual Studio Code Integration
Explore the vRealize Developer Tools extension for VS Code, including project creation, content browsing, action execution and its limitations.

VCF Automation – Build Tools for VMware Aria – Up and Running
Set up Build Tools for VMware Aria on Windows, configure Maven and an optional Artifactory repository, then push and pull Orchestrator actions.
Join the discussion
Sign in with GitHub to leave a comment. View discussions on GitHub.